Monday 16 December 2013

Week 12. Editing, reflection and final additions

I am getting close to being happy with the animation now, but i still feel i could do with a bit more action and urgency towards the end of the scene when all the ships meet. I am going to add some lasers to one of the X-Wings for the scene when it is chasing the Tie-fighter.

NOTE: In hindsight now i wish i had made all the X-Wings in the scene instances and not copies, as then these laser gun modifications i made would exist on all X-Wings. As now i am running low on time and cant modify each X-Wing individually. But still the X-Wing will only be shooting at the Tie-Fighter anyway. as they are capturing the shuttle. 


Firstly i had to create the lasers themselves. This felt fairly straight forward now, i simply used a capsule and added a glow effect in the render effects. I played with the different settings until i found a reasonable representation that i was happy with.  

Laser with glow render effects 

I then needed a method of firing the lasers. I could just animate them using key frames but i found a better way might be to use splines and path constraint like how the ships move. I can then line up and link the splines perfectly at the gun barrels which is much more accurate representation. I then used the splines from the gun barrels as the path for the laser capsules, they will then always shoot forward relative to the ship orientation.  

Lining up and linking the lasers


I made the animation faster by moving the key frames closer together so they will shoot a lot quicker than the ship will be travelling. By utilizing the same techniques i used on the flame output, i looped the animation in the curve editor so the lasers will constantly fire. This also eliminates the need for me to destroy the lasers as they will just stop moving and repeat when the path ends.  

I also took this time to add a glow render effect to the X-Wing flames output. I just used a different material ID to the lasers, this will now effect all the flames on all the X-Wings in the scene as they all use the same material.  

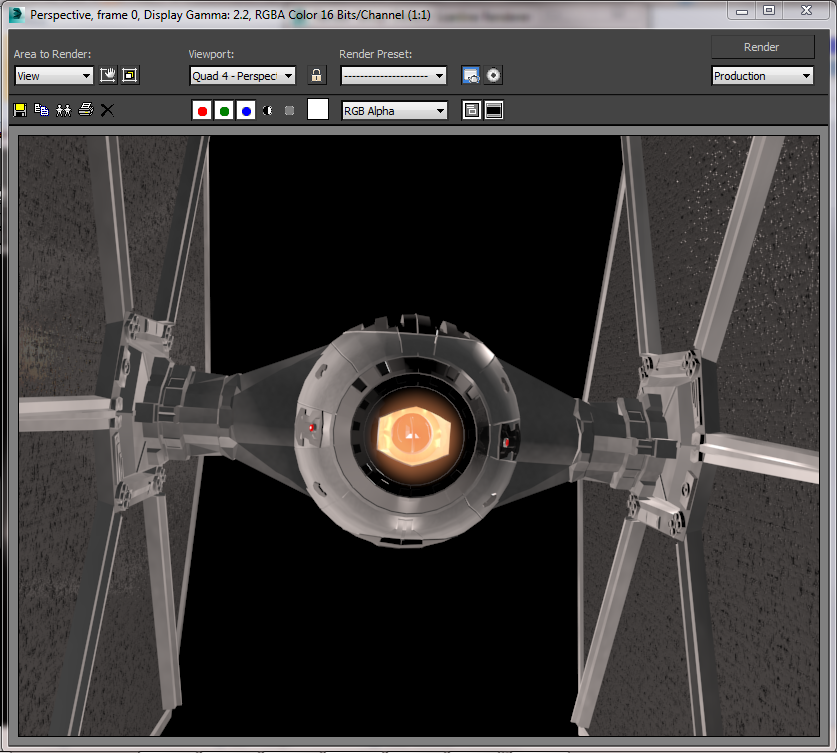
Practice animation with one working laser

Lasers on all guns and added glow to engine flames 


Now when i shoot the scene with the X-Wing chasing the Tie-Fighter it will shoots lasers toward it. This will bring the scene to more of a climax and give the scene more of a hostile nature and just generally more action. 

New Scene with lasers shooting at Tie-Fighter 

I had to re-shoot the X-Wings scenes so they include the glow on the new engine flames.
I wanted to add a quick shot of when all the ships come together too as they all seem to be really far apart then suddenly all together. This will link the first few scenes and the chase sequence together more organically. And i don't have many shots that incorporate all the ships.

All the ships heading into the chase

also i changed the camera angle and position during the shuttle escape scene so you can more of the shuttle but also by moving the X-Wing path slightly we see more of what is going on in the background.

New shuttle escape scene

Final animation edit


I am much happier with the final animation now. There is more action, more build up, and all the scenes link together and flow a lot better. I still think it could be improved though. I shot a lot of scenes separately, ie in different scene files, because i was happy with some but not others, and didn't want (nor have the time ) to re shoot the first ones i was happy with. This lead to the lines i used for movement not being one continuous line, but several broken and smaller ones. Having lots of small scenes and then having to match them up in the editing software proved quite tricky, and i felt a continuous scene would also have a better flow to it. My animation can look slightly broken up at times. Just because this was my first animation and my organisation and ability to plan ahead can improve. I would have liked to have time to add lasers to all the X-Wings too. I did feel quite restricted by the 30 second time limit too.

I am going to continue working with these models and im eager to improve upon my work this far. I want to make a new longer scene and incorporate the improvements i have discussed. It might be nice to introduce a planet surface too so not all of the scene is in space, the chase could maybe accumulate on the surface of the planet. I would also like to inculde some more effcets like sparks flying when the ships get hit and maybe some explosions.

Keep posted for further improvements and updates......................

Monday 9 December 2013

Week 11, Continuing animation

I wanted to go as step further with the x wings engines and try and add a flame output from the exhaust like i have seen in some source images i found. 

images of X-Wings with engine output


I know 3Ds Max has a built in particle systems available but as i have yet to experiment with this i am choosing to use geometry and materials to try and create this engine output effect. 

Starting with a sphere and placing it so the start of it is just inside the engine exhaust, then by using the soft selection option i can drag the upper most vertex and stretch the sphere to create a rounded conical shape. The soft selection tool is useful here as it allows me to specify how many vertices i want to be effected by the modification. 

Positioning and modifying the sphere using soft selection 

The soft selection options allow me control the pinch and the curvature of the sphere to better match a flame output. I can also specify  how many of the spheres vertices i want to be animated. By moving the selection near the base of the flame, just in front of the engine i am left with a cone that can move independently of the base of the object. This means the base will stay stuck the exhaust but the rest of the flame can move and sway around like a real exhaust flame would react.  

Base is stationary but he rest of the flame can move 

The flame as it is is far too uniform so by adding a noise modifier i can distort the vertices to create something that much more resembles a flame. Again this modifier can be specified to only effect the top part of the sphere and leave what would be the source of the flames untouched. The noise modifier adds animation key frames by default. By moving these key frames closer together we can shorten the length of the animation and make the flames animate faster which is more desirable for this particular effect. By then opening the curve editor i can set the tangents to linear and also control the out of range types which means that the animation will keep looping beyond the initial key frames that were set. This means that the flames will be constant animation throughout the scene and i don't have to worry about it.       

Adding a noise modifier to create a flame effect 

By then adding a gradient ramp i can to specify the fall off of the material and by using the sliders chose where and by what intensity the colour changes. This gives a nice blend out form a strong red colour near the base of the flame and an accurate and fairly realistic wispy yellow towards the end of the flame.  

Adding gradient ramp to flames material

I added a UVW map modifier to apply the material and by moving this down so there is a part of the flame not included in the cylinder, i get a break in the material and the flames give the impression of dying out.  

Adding and moving UVW cylinder map

Finished flame geometry and material 

I might add a glow to the flames, even though the material is self illuminating i feel it could be more of a potent glow.

The flames could then be duplicated and moved to each of the four engines, i made each a copy not an instance as i changed the seed for each noise modifier. This means that they all animate in a slightly different rhythm and time giving me a much more random and realistic effect. 

I am very happy with how these flames turned out. So i will now move back to adding some better scenes to my animation sequence.

We left last week with a draft animation that didn't really link up or have a real flow to it. So i went back to the drawing board.

I am going to keep the first 3 scenes, but i have decided to remove the first two Tie-Fighter scenes as i cant justify their contribution to the final animation. I need to establish the relationship between the shuttle and the tie-fighters quicker, as i only have 30 seconds. I also want to introduce the x-wings in a different more deliberate way. So we know that some kind of chase is happening, because before the three ships didn't feel like they linked in anyway to each other.

The first few scenes are initially and intentionally quite slow as i want to build the scene up and gradually increase tension as i introduce more ships and the chase unfolds. At first it seems the shuttle and tie-fighters are in no real danger, but as we see the first X-Wing shoot over the camera and come into view the audience starts to feel uneasy. Or at least this is my intention.

X-Wings fly over camera one by one 
  

I feel the new shot is a lot better. The fact that one X-Wing comes into view first then we see 5 more quickly come sweeping over the camera definitely increases the tension and catches the audience by surprise a little.


Updated animation including new x wing scene
  

NOTE: I hadn't actually removed the tie-fighter scenes here but i have added the latest scene discussed above. 
    
The first two X-Wing shots i feel are taking up too much of my 30 second time slot, and are preventing me from moving the scene along. Its meant to build up to a chase sequence but im left with no time to do this.

.........................................................................................................................................................

I have removed the the first few Tie-Fighter scenes and the first two X-Wing scenes this has freed up some valuable time for my animation. I also feel while the latest X-wing sequence is an improvement it still does not establish the X-Wings are in fact in pursuit of the shuttle and Tie-Fighters.

I shot a new scene and thought if the first time we see the X-Wing it is heading toward and chasing the shuttle, its makes the intentions of each ship much clearer much quicker.
I animated the camera slightly when the x-wing comes over so it looks like the camera shakes, or gets bumped out the way when the ship flies over. It also gets a nice view of the rear of the ship and the engine output. Although this happens a bit too quickly for you to really notice. 


X-Wing chasing Shuttle and Tie-Fighters 
     

After introducing the first X-Wing i made a shot of the rest of the small fleet flying over the red planet in pursuit. 

I deliberately lagged the camera behind the ships slightly when the pass over the camera to exaggerate the speed of the X-Wings. As the next scenes they will be have caught up with the rest of the ships.     

X-Wings fly over planets to join the chase

Updated animation draft edited and includes new X-Wing scenes

Now i have more of my 30 seconds remaining i can have more of the actual chase, and have all the ships in the same shot which helps bring the individual scenes together. The animation as it stands is only 21 seconds. 

By this point in the animation all the ships are together and the X-Wings can split up to destroy or apprehend their target.


Tie-Fighters look back at X-Wings during chase


Shuttle being chased by X-Wing clip


X-Wing chasing Shuttle (X-Wing view)   


X-Wing hunting down Tie-Fighter 


When hooking up this particular camera i used a target camera and linking the camera itself to the x-wing and the target to the Tie-Fighter. This gives a nice variation in the camera views as the ships move along their respective splines. And its also meant to feel like the X-Wing is trying to lock on and target the Tie-Fighter.

By always looking back from the shuttle and tie-fighters and always looking forward from the x-wings perspective, i am hoping this exaggerates the fact that the X-Wings are the on the offensive, and the shuttle and tie-fighters are in defensive mode. Like they are looking over their shoulder.

Updated to include new scenes


The animation now feels more complete and at 29 seconds there is little room for more additions. But i still think it can be improved. Perhaps add a short shot of all the ships when they come together as it still seems there is a small jump between the X-Wings flying over the planet and then suddenly they are all together chasing each other. I certainly feel the scene has a nice steady build up now and the chase is more of a climax (Albeit a quick and quite mild one). But i am limited to quite heavily by the time scale. I could of just jumped straight into a chase sequence, but i wanted to try and set the scene a little and build up the scene, so even though its 30 seconds it can almost have a beginning, middle and end. 

Sunday 1 December 2013

Week 10. Animation techniques

Before we start animating the scene we need to set up some cameras where the animation will be viewed from. For this animation I will be using two types of cameras; a free camera, which has a position and orientation, and a target camera. The target camera also allows the camera to focus on or target an object or location in the scene. This has the benefit of focusing the audiences attention to a particular object or action in the scene. 

I will elaborate more on specific camera angles and shooting techniques i using and what i am trying to achieve to employing these techniques as i talk through each scene. 

Moving onto animation I started exploring different methods and techniques of  moving objects around my scene. 3Ds Max has an auto key feature which allows for easy basic movement of objects, we can just switch this auto key feature on and specify what we want to happen and when on the timeline with key frames. .     

Timeline

The time line is measured in frames not seconds, so we can choose how many frames we want per second in the set-up and then work to that scale. For the purpose of this animation I will be using 30fps ( frames per second ).

First I needed to just get the wings of the shuttle to open smoothly and evenly as possible and to get a mechanical style movement.   

Practicing paths and shuttle wings opening


Still getting to grips with the animation techniques I started to move objects around the scene using path constraint which allows an object to follow a 2d spline. This method gives a much smoother movement path as opposed to manually changing its position using the drag and move tools. It also allows you to plan ahead in your scene and make an entire flight path or movement in one go.

I created some basic planet models and textures and introduced them into my scene. As the entire animation sequence is in open space i feel like the planets will help show the audience that all these ships even if not all them are in view at one time are actually occupying the same area. 

Planet and Moon


I added lights to act as a glow using the same method as i did when adding the engine glow to the tie-fighter, this is meant to act as a representation for the atmosphere or environment for the planets, which just adds to the overall realism of the scene.

I am going to take this time to explain that this assignment we had the choice to re create a scene from one of the star wars films or to create our own original scene. I am not all that familiar with the star wars films and i wouldn't know what scene i could find that would include the three ships i chose to model, hence i am creating my own scene form scratch. 

I am hoping this will not become too much of an issue as this is my first animation i have ever attempted having a scene to follow might help me with things like direction and camera angles which i am inexperienced in. But on the positive note this does leave a bigger scope for creativity.

In my scene i plan to focus on an imperial shuttle which is being escorted by two friendly Tie-Fighters, i then introduce a small fleet of X-Wings who are interested in stopping this escort and apprehending the shuttle for themselves. 

I feel like an opening scene just depicting the planets and space will help set the scene and quickly establish the theme of the scene and animation. I am hoping this will help exaggerate the feeling of a vast and open space ( it is of course taken place in open space).
   

Opening scene camera pans over planets and open space


The next scene will introduce the shuttle to the audience, i feel having it the first ship to appear will tell the audience that this is a ship we are interested in, and it is clearly is of some significance.

Shuttle entering over planet 

I want to switch this shot half way through to a different camera that shows the shuttle flying right over it. This not only helps show the model up close in detail but also makes the audience feel intimidated as the shuttle feels like it is coming towards them. The idea is that with the ship looking down onto the camera and audience the and ship is a superior entity. By just shooting the same sequence twice from different camera angles i can then switch the shots when i come to edit the whole animation.

Close up fly by of shuttle 

After the initial shuttle scenes i need to introduce the escorts (Tie-Fighters) to show the audience that the shuttle is not alone, and the fact that it has escorts must mean it is of some importance.

I want the detail in the models and materials to come out in the animation so position cameras at the rear and the front of the cockpit shows this detail well. Also during the animation sequence switching to a camera on the front or just to the side of the cockpit gives the audience a view similar to the pilot of the ship making them feel part of the action.  

Rear Tie-Fighter camera sequence


A potential drawback i have spotted with this particular scene is that without a point another point of reference in the camera view the audience might not grasp where the Tie-Fighter is going or what its intentions are. The shuttle very briefly comes into view but only for a second, and that's the only point in the scene where we realize that this ship is in fact in the same area and is linked in anyway to the opening scene. I like the view as its a nice angle to see the Tie-Fighters detail and texturing, but from an animation perspective giving this clip context in relation to the entire scene might prove difficult. I will go back and address this when i start to edit the individual scenes together if it does in fact prove the case.

Tie-Fighter fly by scene

I need to introduce the two tie-fighters into the animation so i made a clip of the them flying towards and over the camera to join the shuttle. I am trying to up the sense of urgency here in this scene by having the tie-fighters move quicker than the shuttle has been previously. I found a similar problem here as in the previous scene as there is no clear indication of what these ships are doing or what there relationship is to the shuttle, Again the shuttle is not actually visible in the scene. I like the camera angle and the urgency that it it starts to create, but it feels a bit like an airshow or a showcase, the ships are just flying over each other which looks nice, but i'm not sure it adds much to the animation as a whole.      

Tie-Fighters enter shot and escort Shuttle 


Showing the shuttle flying with the Tie-Fighters indicates that the ship is being escorted and the tie fighters are friendly to the shuttle. This scene is think is necessary to establish the relationships between the ships, ie friendly or hostile. 

Initially i was going to just have the shuttle and its escorts in the scene and then cut to a different shot of some x-wings entering the scene. I was again going to use two or three different camera angles one side view so we can get a nice view of the ships and switch to a cockpit camera which again puts you almost at the pilots perspective bringing the audience into the action more. 


Introducing X-Wings 


I feel while this shot is aesthetically pleasing i might be looking at this animation the wrong way, while i am eager to display the models as best i can i need to think more about how the scenes link to each other and what they are contributing to the overall animation.

NOTE: You might see that the X-Wings have a flame output form the engines i will discuss how i made these in the next blog entry.  
X-Wing Cockpit Camera


An issue with my materials surfaced after i shot this particular scene, i noticed that as my screen materials opacity is not at %100 we can see directly through the screen and out the other side. And as the polygons are only rendered from the outside we can see all the way though to the space background and the planet. I just simply solved this by adding a cube inside the cockpit. I could of in theory have changed the materials opacity back to 100 as well.

With the scenes i have shot so far i edited together couple a draft animations. 

Draft animations


The first 3 scenes, the pan over the planet, the shuttle flying over the planet then flying over the camera i think work. They set the scene a little, only a little as i only have 30 seconds. But i still want some context given to the scene. The audience feels relaxed at first and then things start to happen more ships tart appearing and it grabs your attention.

But while the rest work well individually, im not sure they link up well enough to the rest of the animation. I am going to shoot some scenes again and i might shoot some new ones. I just feel i can do better.

I am still learning as i go and with each animation i watch back i have learned a little bit more and think i can improve upon it.

Thursday 28 November 2013

Skydomes

I wanted to add a night sky/space background to my scene. The simplest and most effective way i found of doing this is to was to add a geosphere to my scene and simply apply a tiled night sky texture.


The texture appeared slightly deformed at the top and bottom points on the sphere however so by scaling down on the z axis i was able to reduce the amount of distortion present.


Shuttle with lit skydome 


Sunday 24 November 2013

Week 9, texturing Tie-Fighter

Taking note from when i textured the shuttle the first thing i wanted to add to the Tie-Fighter was an engine glow. I wanted to keep it simple so i experimented with omni lights. Omni lights spread light equally in all directions, and you can specify and modify the attenuation, which is essentially how far the light will spread. By reducing the start and finish points of the attenuation of the light i made it so the glow would only protrude slightly form the rear of the engine. By adding a volume effect and adding noise to the light i can make the attenuation visible to create a dome like glowing effect. I also made sure that this particular light did not effect any other objects in the scene as i will rig up other lights for that i want this light to just interact with the Tie-Fighter itself.      

Positioning engine onmi light inside fuselage 

Engine glow 

I approached the Tie-Fighter slightly differently to previous models. I have been using the UVW Unwrap modifier up to now, but i can see problems arising with this model. The main sphere that is the fuselage has been heavily modified and sliced and cut, and i know i am not going to be able to get a workable template as the polygons are irregular and numerous. So the Tie-Fighter is going to use mainly procedural maps created in 3ds Max. 

I still detached parts of the ship that were going to have different materials or variations of materials. I also added some more geometry to the wings to better fit the source images. I did try to achieve this wing detail with materials and maps but to no success. I did however get an idea for the main wing panels though while experimenting with bump maps.   

Detaching roof

Detaching main wing

Detaching guns mounts

As the inside of the cockpit has no detail in it i made the glass texture for the view port completely opaque and reflective. If i decide to develop these models further past the assignment i would like to add some cockpit detail and make the glass see through slightly. This would add to the overall realism of thee models.
  

Making use of the numerous maps slots in the material editor you can start to build up realistic and reactive surface textures. Starting with a basic diffuse texture created in gimp and then adding a dent bump map the solar panels on the wings start to look quite realistic, as the map gives the illusion of depth without the geometry. The bump map channels when used effectively can give a high level of detail without adding excess and numerous polygons. The number of polygons i would need to modify to get a similar effect with geometry would severely impact my overall efficiency of the model. I still have a lot of control over the material in the editor i can specify the tiling the angle and the offset, all without having to wrestle with the UVW maps.

Another reason why i chose this method is that when i made the model, unbeknownst to me, the wings somehow became overlapped, and there was polygons occupying the same space. This was the first model i made so mistakes were inevitable. I think this happened when i applied the symmetry modifier, i wasn't particularity comfortable with it at the time, and although it looks OK at the time, when i looked at the wings from certain angles the geometry would strobe. I did try to export the map, paint it, then apply it back on, but the textures just did not display properly because of the geometry.

Creating wing panel material


Adding a reflective map on the wing panel material really brought the texture to life for me, and made it look realistic. It will react with the light and other objects in the scene which is how the material would react in real life. 

I chose to use a different darker metal material on the detached parts of the fuselage and cockpit. Originally i had all the materials the same through out the main part of the ship, but i found this approach did not bring out the detail in the separate parts of the model. By having a darker material on the roof hatch, the view-port rim, small panels on the fuselage you are forced into paying more attention to these parts of the ship. And the contrast means you can clearly see that these parts are in fact separate, where as with one main material the colours and geometry just seemed to blend in. Hence i lost some the detail i put so much time into. I also found that making another colour material for even smaller detail on the detached parts of the ship helps bring these details to the audiences attention. 

Using  glass effect texture on the rear lights and the guns again helps distinguish between these details and the main ship. Such small detail is in danger of being overlooked so enhancing its reflective qualities and using a bright colour makes these details stand out. Its true that this is how the original is textured also, but changing the other parameters and not just the colour i found makes a real difference and certainly improves the quality of finish on the models.      

Variation of metal material on Fuselage

Rear lights material being added

Gun material clearly distinguishable 

Overall i fell the materials i have used really does the model justice, no detail is lost and they look quite realistic when rendered. In fact i think that look more realistic than the textures i made i GIMP for the previous models. I was more restricted with the detail i could ad however. I will be interested to use a combination of the two methods in future projects.

Finished Tie-Fighter (Rendered Views)


Wednesday 20 November 2013

Week 9. Unwrapping & Texturing Imperial Shuttle

Applying the same methods i discussed in the last blog entry, i moved on to texturing the Imperial Shuttle. While the process is very time consuming it is vital you spend this time if you want your models to look as realistic an accurate as possible. 

The slight difference with the shuttle as apposed to the X-Wing is that the shuttle is mainly comprised of grouped objects instead of one large main mesh. This certainly beneficial and saves you some time when it comes when in comes to unwrapping the parts of the ship.  

Detaching wing panels for texturing  

There was still times when i decided to detach individual panels of the ship, on the wings for example. This just makes working in Gimp much easier, as when i was creating a weathered and scratched surface i wanted these details to be all facing the right way, ie, from the front to the back of the ship. This just ensures all the textures are uniform. This also allows for a cleaner more precise texture when there is a variation on the colour on certain panels of the wing.   

Unwrapping the main wing 

Wings fully textured 

I added a reflection map to the glass to clearly differentiate the the metal and glass textures. I also lowered the opacity setting slightly, not too much though as the original source images clearly show a tinted translucent effect. The reflection makes the material look a lot more realistic and might have some nice effects when i start to add a skybox and lights to my scene. 

Editing and applying screen material 

For the smaller less significant parts of the ship a basic texture could be applied without the need to unwrap and export a UVW map. I have seen previously that the time spent doing this on the the small complex and insignificant objects on the ship does not justify the final outcome and my time is better spent elsewhere. So for the small detail at the rear of the fuselage and the gun barrels a basic texture was applied. 

Shuttle fully textured

Rendered views of finished shuttle 

When the texturing was complete i started to have a little play with the wings on the shuttle. I plan to animate the wings to show them opening during flight. This is when grouping parts of the model together as opposed to attaching them to be one larger mesh becomes significant as i can isolate the wings and manipulate them individually. 

Rendered views of ship with wings folded in 


The only thing i would like to add  is when i move onto adding lights in the scene i will try and create some sort of engine glow for the rear engine. As without it the ship appears to have to propulsion which will look unrealistic when i start to animate the ship.